

How You Calculate The Earth Pressure On Basement Walls And Other Underground Structures
Episode #9 of the Structural Loads Series

Happy Wednesday, ☀️☀️
I was very surprised how HUGE the horizontal loads from the earth pressure were when I verified the stability of my first underground parking garage project.
In that project, the lateral loads from the earth pressure were 5-10 times bigger than from the wind load.
If you are lucky, then the earth pressure doesn’t have an influence on the stability of your structure because it might be of the same magnitude on the walls on the south and north side and the west and east sides.
But if the project has construction stages, where the full earth pressure is considered on one side and not on the other side, the resultant load will be very big.
In this article, you’ll learn how to calculate the earth pressure. At the end, you’ll know for what lateral loads you need to verify basement or retaining walls, or the stability of a basement.
My Professional Background
Scroll down if you only want to learn about how to calculate the earth pressure. ⬇️⬇️
Last week I already warned you, that this week I will give a quick intro to my professional background. So you understand better, what Structural Basics is based on. You can read in detail about my previous experiences (and even some things about my life) → here ←.
All jobs I’ve ever had were construction related. And there have been many over the years. From when I was a teenager until I got my first student job in a structural engineering consultancy, I worked the school/uni breaks helping my dad’s friends renovate houses or in their construction companies.
One summer I was working in a carpentry building timber roofs at 30°+ sometimes 12 hours a day, 6 days a week.
Another job (probably the hardest) I had, was scaffolding. Again, we worked 50+ hours a week. I still remember to this day how crazy hard it was. Have you ever tried to lift a steel scaffold? After the first day, I wasn’t able to drink from my bottle any more because by holding my bottle, I got cramps in both of my arms. I usually left the house at 6 am and didn’t return before 7 pm. They told me that 9 out of 10 students who help in the summer quit after the 1st week. I think that was what motivated me to not quit. I am not a quitter, and not like everybody else. And actually, after 6 weeks, it wasn’t that physically challenging any more.
My dad is a partner of a heating and sanitary installations company. I also worked there one summer.


Before I started my bachelor’s in Civil and Environmental Engineering at the University of Innsbruck, Austria, I worked in a few of these construction jobs for a whole year to earn money for my studies but also to travel South-East Asia for 3 months.
Then in the summer between my 4th and 5th semester I did my first internship in a structural engineering consultancy in Munich where I worked in the bridge inspections department. That was also the end of working on construction sites.
Right after the internship and when the 5th semester started I got a student job in another structural engineering firm where I joined the BIM Management department until I finished my bachelors.
When I started studying Civil Engineering, I thought I would become a site engineer. I didn’t even know what structural engineering was. Yeah, I mean, I had nobody to ask. I was the first one in my family who went to university. I only knew that I was good in Maths and Physics and that this program had a lot of it (😄). But during my bachelors, I started to fall in love with structural engineering. And I was also very excited about BIM. At the time when I graduated (2019) it was this new thing in Germany and I saw an opportunity to become an expert very quickly.
Back to my student job. I liked it so much working in BIM that I decided to take a break from studying. I worked for 1 year as a BIM modeller in the bridge department of a structural engineering firm. I got really nerdy about automating our workflows and implementing new ones with parametric design (Dynamo and later Python).
After the year as a BIM modeller, I moved to Copenhagen, Denmark to start my master’s in Architectural Engineering at the Technical University of Denmark (DTU). Why I moved to another country where I didn’t speak the language? That’s a topic for another time.
Anyway, I started my masters and started to get excited about structural engineering again. You know, this feeling when you study for example how to design and verify cable-stayed bridges, and you forget the time? That was me about all the structural courses I took.
When I moved to Denmark and started my masters, I worked in a student job in BIM Coordination in a construction company. I worked on some really big projects here in Copenhagen doing clash detection, BIM modelling of site equipment, 4D simulations, setting up digital check lists in Dalux, and much more. I chose a construction company to also see the other side of engineering - the execution, and to get an understanding of how people work in construction. I don’t regret having had that experience
But deep down, I knew that I wanted to work with structural engineering. So after 2 years and in my last master semester of my masters I changed to a structural engineering firm. I was lucky that I could join their computational/ parametric design team, which was and still is developing an in-house Grasshopper plugin. I helped to set up all the load bearing capacity tables of the elements that the plugin is verifying and get my first projects where I used the plugin. This was great because I could combine structural design with coding and parametric design. Also during that time I got my first small structural engineering projects, mostly renovation.
I wrote my master thesis about “Reuse of Structural Steel Elements - The use of non-destructive test methods to determine structural properties”. Maybe that’s also a topic for another article? Would you be interested in that?
After I graduated, I started a full-time position as a structural engineer in the same company I worked in as a student. I am still there and very happy as I get a lot of responsibility and challenges. 🙌🙌
I’ve been mostly working on precast concrete buildings and small renovation projects where I design, verify and document the structural design. Given my background, I often do drawings myself or make changes in the BIM model myself without the help of a BIM-modeller/ drafter.
Here’s a list of a few things I designed:
Stabilizing systems of precast concrete buildings like shear walls, reinforced concrete frames, steel wind braces and floor diaphragms
Robustness assessment and calculation of additional reinforcement to comply with robustness requirements
FE analysis of in-situ concrete slabs (raft) supported by piles, pile caps and foundation beams
Pile caps, piles, foundation beams, strip and pad footings, well foundations
Openings in existing walls for doors and windows
Reinforcement of existing masonry walls to take up additional horizontal loading
Plywood roof diaphragm to distribute the horizontal loads to the stabilizing system
3D FE analysis of steel structures and connection design
Timber roofs and timber connection design
Timber frames
Most of these things I haven’t covered on Structural Basics yet. I am excited to so in the future.
This was a lot about my background. Now, back to calculating the earth pressure…
7 Steps To Calculating The Earth Pressure On Basement Walls
We learn best with examples. So in this article I show you how to calculate the earth pressure a retaining wall. We’ll use 2 different soil layers with groundwater starting 4m below terrain.
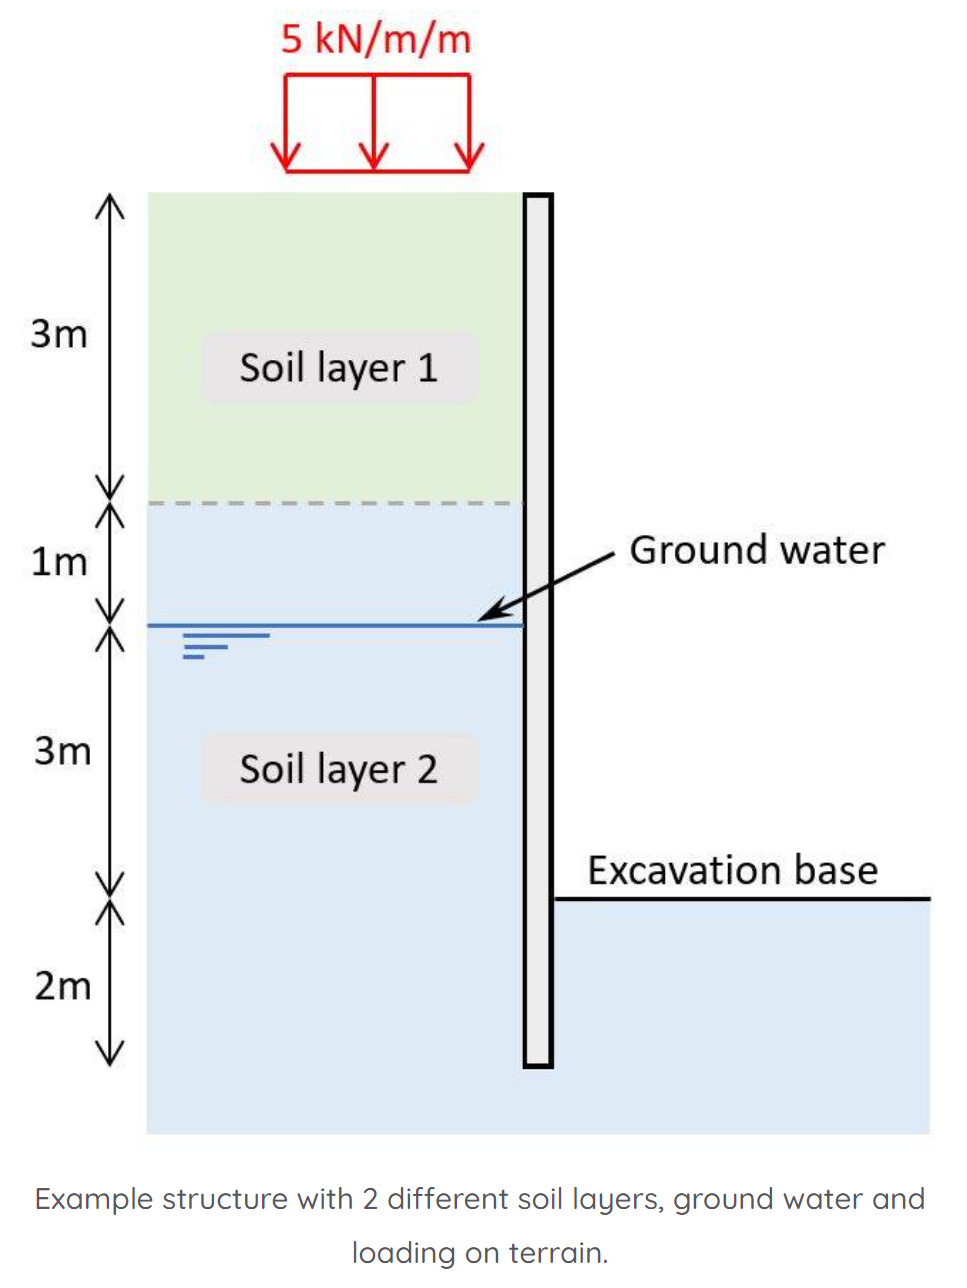
Now, this is a simple example of a retaining wall. But in my upcoming book (which I talk about alot - i know) we’ll calculate the earth pressure for an actual house and apply the loads from the earth pressure on the basement walls.
Step 1: Find the soil properties of the different soil layers
Most soils are either clay or sand, or a mix of the 2. In some parts of the world, like Sweden, structures are supported on rock. The soil properties are defined by a geotechnical report that has been done before a structural engineer designs the foundations or underground structures.
For this article, we’ll use the following soil properties:

The partial factors for angle of friction and effective cohesion are used to calculate the design properties of soil. Note that these values are different for each country, as every country has its own national annex.

Step 2: Calculate the Rankine earth pressure coefficents
The Rankine earth pressure coefficients are used to calculate the earth pressure for each layer at a depth z.

If we use these formulas with the soil properties of step 1, we’ll get the following earth pressure coefficients:

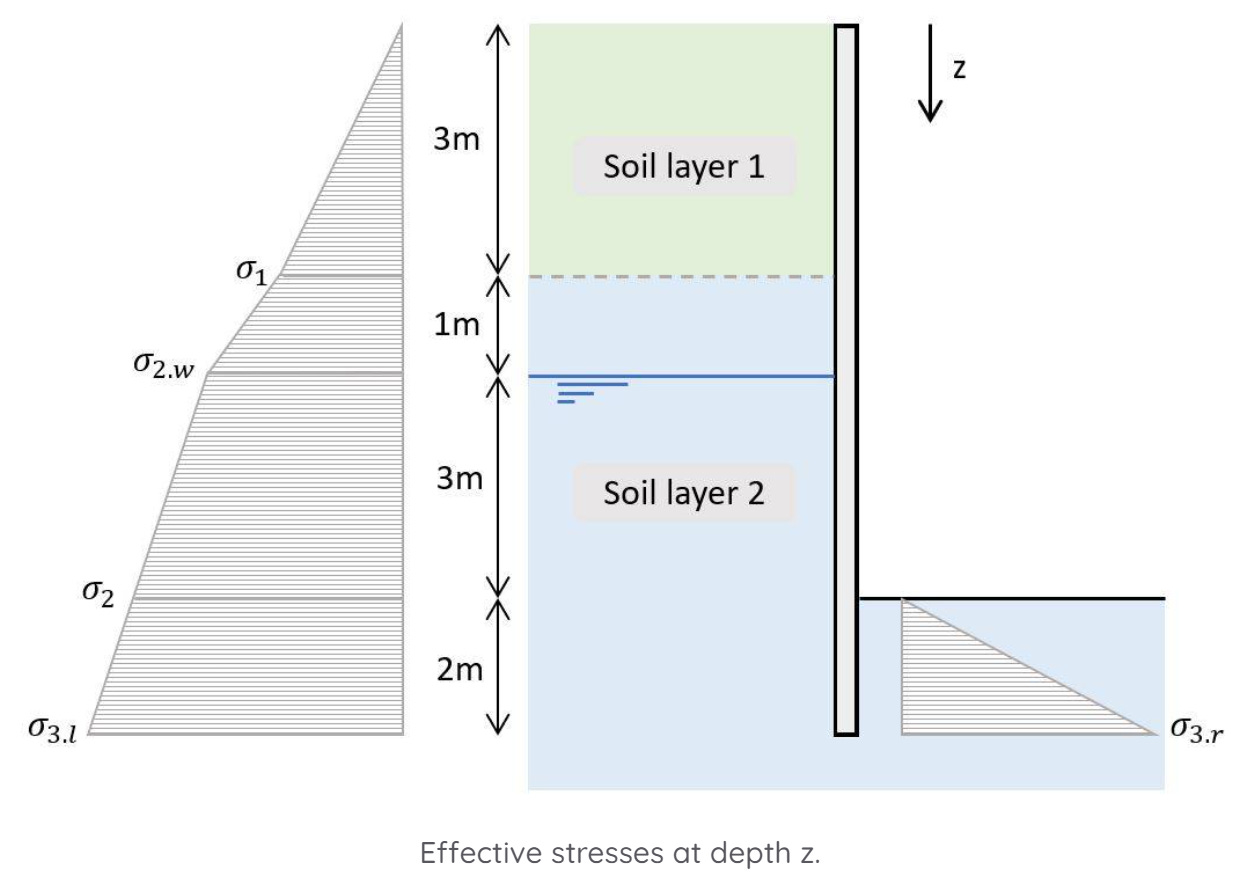
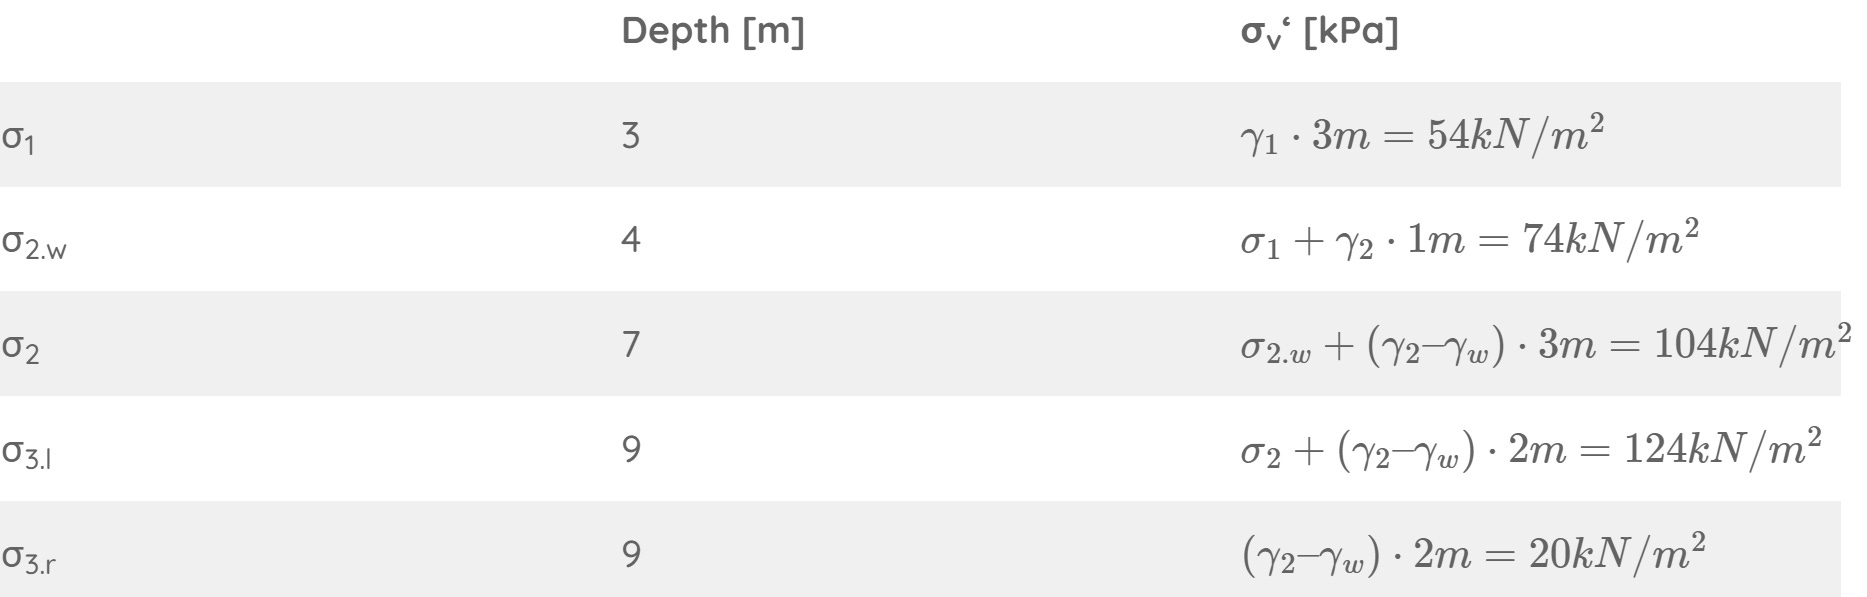
Step 3: Calculate the effective vertical stresses
The effective stresses depend on the weight of the soil (= unit weight γ) and are calculated for the depth z as:

Where γ is the unit weight of the soil layer above the groundwater table. Below the ground groundwater table γ-γw is used respectively.
Step 4: Calculate the Rankine active and passive earth pressures
The Rankine active and passive earth pressures are calculated with the vertical effective stresses and the Rankine coefficients that we derived in steps #2 and #3.

So, let’s calculate the earth pressures for the different depths.


Step 5: Define and apply the cohesion
Cohesion describes how well the soil particles stick together. The cohesion of a soil layer is actually beneficial, meaning that it reduces the lateral load on the retaining wall.
The cohesion is calculated as:


These values are now applied to the retaining wall.

Step 6: Apply the hydrostatic water pressure
The groundwater below the groundwater table also exerts load on the retaining wall. The pressure increases with increasing depth, which is calculated as hydrostatic water pressure.
The load distribution is triangular and the value of the hydrostatic pressure at depth z is calculated as:

We subtract 4m because that’s the depth/elevation where the groundwater starts. Here’s the water pressure for different depths z:


Step 7: Effects of live loading on terrain close to the structure
Another action on a retaining wall or sheet pile is a vertical load on the terrain close to the retaining wall.
This could be a live load from construction vehicles or even an existing building, a street or another permanent structure.

The vertical loading is located 1m away from the retaining wall. We can calculate the spread of the vertical stresses from this load with a 2V:1H slope.

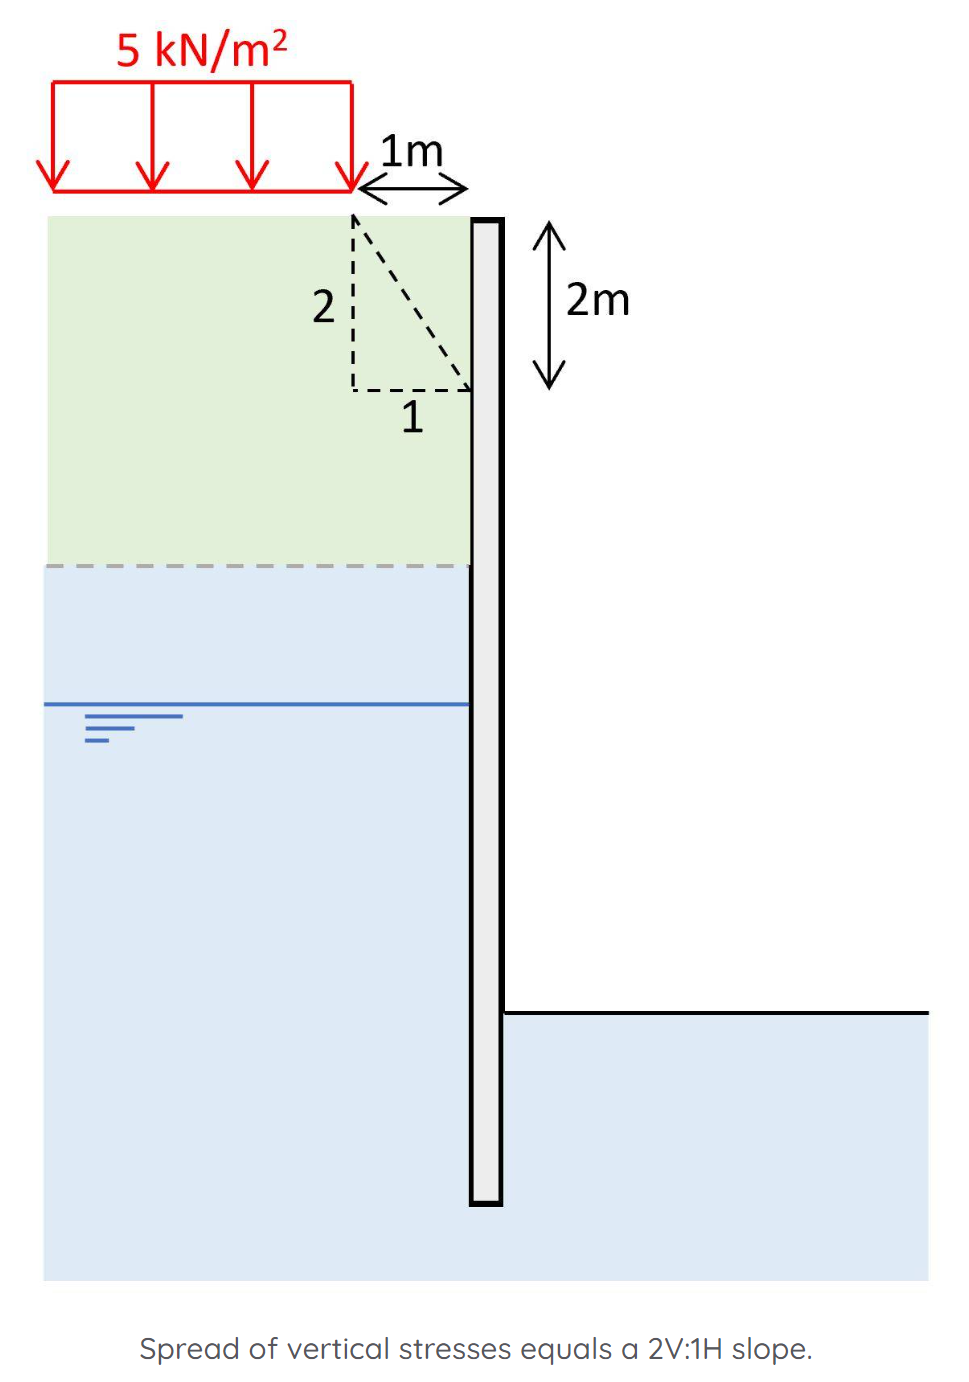
From the vertical stresses we can calculate the horizontal pressure on the underground structure which is uniformly distributed.


Final Words
All these loads that we just calculated - earth pressures, cohesion, hydrostatic water pressure and pressure from vertical loads near the structure need to be combined in load combinations to calculate the design values.
That would be too much for en email, but we’ll do that in the book that I’ve mentioned many times by now.
Next week, we’ll check out another type of horizontal load. ✌️✌️
If you missed episode #1 - #8 of this series, then you can find all previous posts → here ←.
Have a fantastic rest of the week and see you next Wednesday. 🙋♂️🙋♂️
Cheers,
Laurin. 😎😎
HOW CAN I DOWNLOAD THE LECTURES FOR MY STUDENTS.