

The Dead Load
Post #2 of the Structural Loads Series

Hello friends, 🙋♂️🙋♂️
Last week, you got a short introduction and overview of all structural loads that we use as engineers to design buildings. Today, we start to look at the first structural load - the dead load - more in detail - what it is, how to calculate it for different elements and how to apply it to the static systems.
So let’s get into it. 🚀🚀
What Is The Dead Load?
The dead load refers to permanent loads that act on a building, such as the self-weight of structural elements (like concrete slabs and steel beams) and non-structural building components (like roofing, windows, and flooring). The weight is calculated and then applied to the structural member that carries it.
In structural design, this weight – the dead load – is a constant factor to make the calculation more straightforward. Each element in a building contributes to the dead load.
So, if you’re doing a renovation project and you, for example, increase the weight of your floor, you should consult with a structural engineer whether the slab can resist the additional load.
Now, let’s check out how we calculate the dead load for different structural elements.
Calculation of Dead Load
How the dead load is calculated depends on the structural element that needs to withstand the load.
For example, the dead load of a slab is usually calculated as an area load (kN/m2) because the slab itself – a 2D static element – needs to carry the load. On the other hand, the dead load applied on 1D static elements like beams, columns, rods, etc. are usually either line (kN/m) or point loads (kN).
So let’s have a look at examples of the dead load before we’ll check out how to calculate the different dead load types. 👇👇
Examples of the Dead Load
Here are some examples of building materials which need to be considered in the dead load if used:
MEP equipment
Staircases
Steel, concrete & wood beams
Elevators
Glass windows and panels
Facade elements
Timber & concrete slabs
Insulation
Roofing
Bricks
Tiles
Ventilation ducts
Steel, concrete & wood columns
Heating systems
Solar panels
Garage ramps
etc.
Just to mention, a few 😎.
Depending on the structural element the building component is attached to (supported by) the dead load is either calculated as an area, line, or point load.
Area dead load

Example
The Area dead load of a concrete slab with a density of 2400 kg/m3 and a thickness of 18 cm is calculated as
Now, as engineers we don’t use kg in our calculations anymore, the unit needs to be transferred from kg to kN [Kilonewton]. Btw, a few decades ago, engineers still used kg. But in my experience, they barely added the units in their documentation. It was clear to them at the time. But whenever I am working on a renovation project and need to go through the existing structural documentation, it’s detective work to find out how and with what units they calculated the elements.
To get kN you need to multiply the result by 0.0098. Or if you are a bit lazier, in most structural engineering cases it’s enough to multiply it by 0.01.

This area dead load we now apply to the slab. In our calculations, we usually design in-situ concrete slabs in a FE program like Robot, FEM-Design, Rfem or Sofistik. This is something you can learn from the e-book I am currently working on. I’ll run through all calculations needed to design a residential house. I’ll update you on the development of the book soon.

Line dead load
Here’s the formula:

The dead load is used as a line load, for example for beams.
Example
The line dead load of a wooden GL24h beam with a density of 420 kg/m3, cross-section width of 10cm and a cross-section height of 20cm is calculated as:

As for the Area load, the line load also has to be transferred from kg to kN.

Then we’ll apply this line load to the beam.

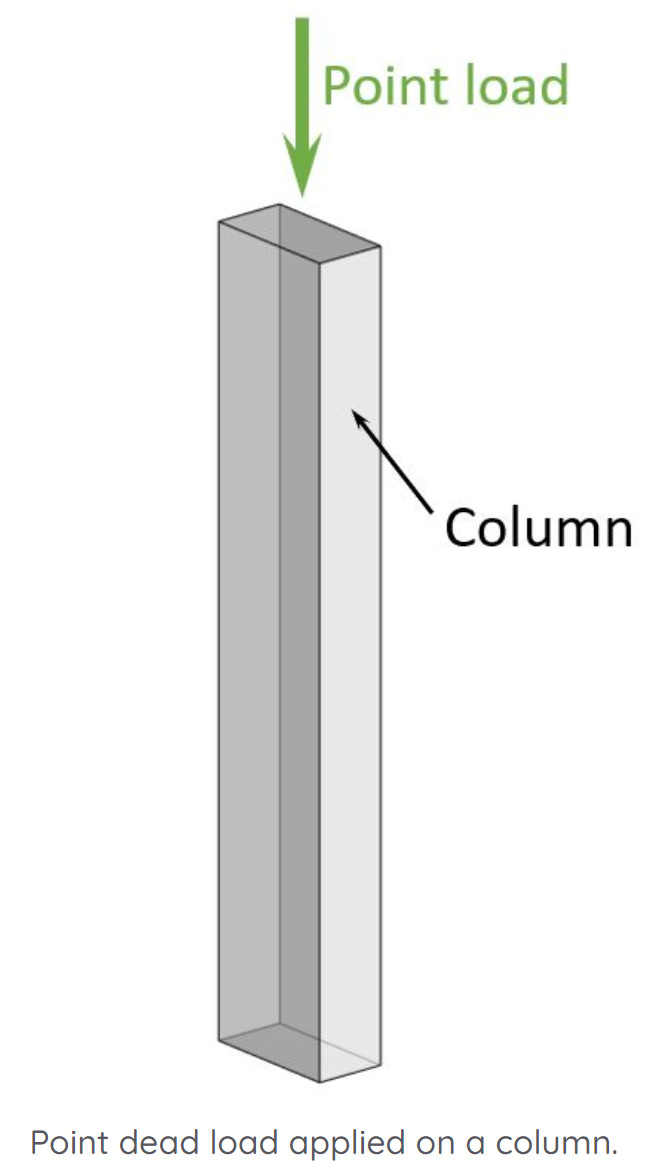
Point dead load
Here’s the formula. The point dead load is applied to, for example, columns:
Example
The point dead load of a wooden GL24h column with a density of 420 𝑘𝑔𝑚3, Cross-section width of 50cm, a Cross-section height of 50cm and a length of 3m is calculated as
As for the line load, the point load also has to be transferred from kg to kN.

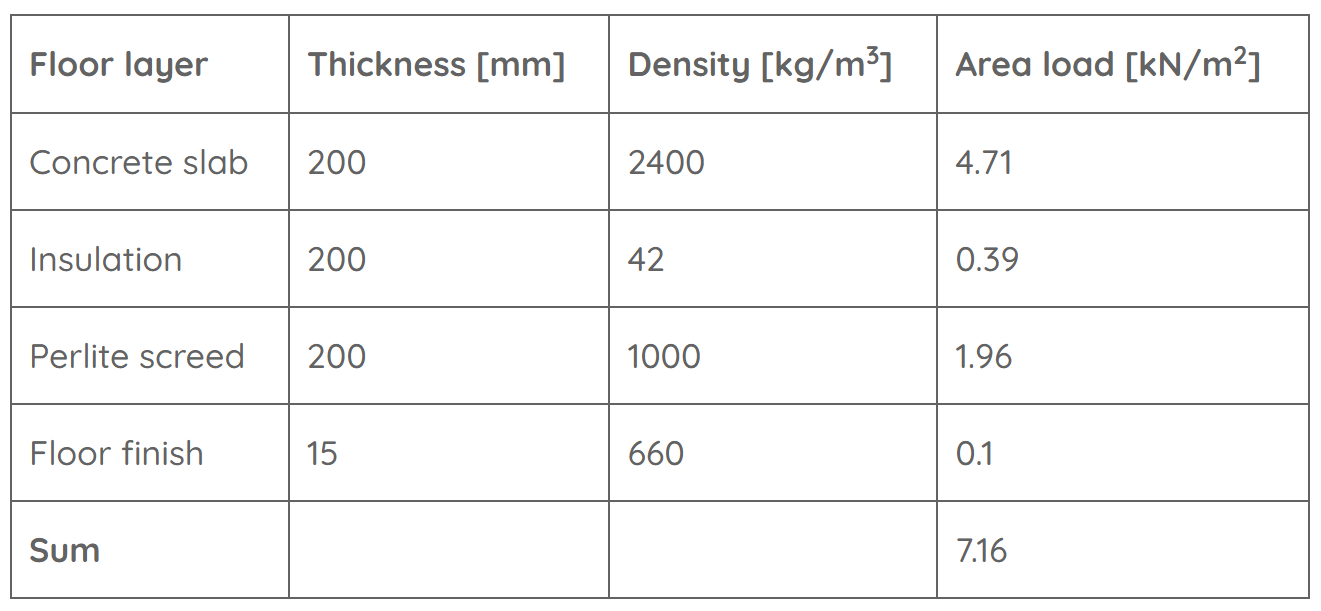
Example Calculation Of The Dead Load Of A Floor
In this section, we’ll learn how to calculate the dead load of a floor. The floor layers are usually given by the architect on drawings or in 3D BIM models.
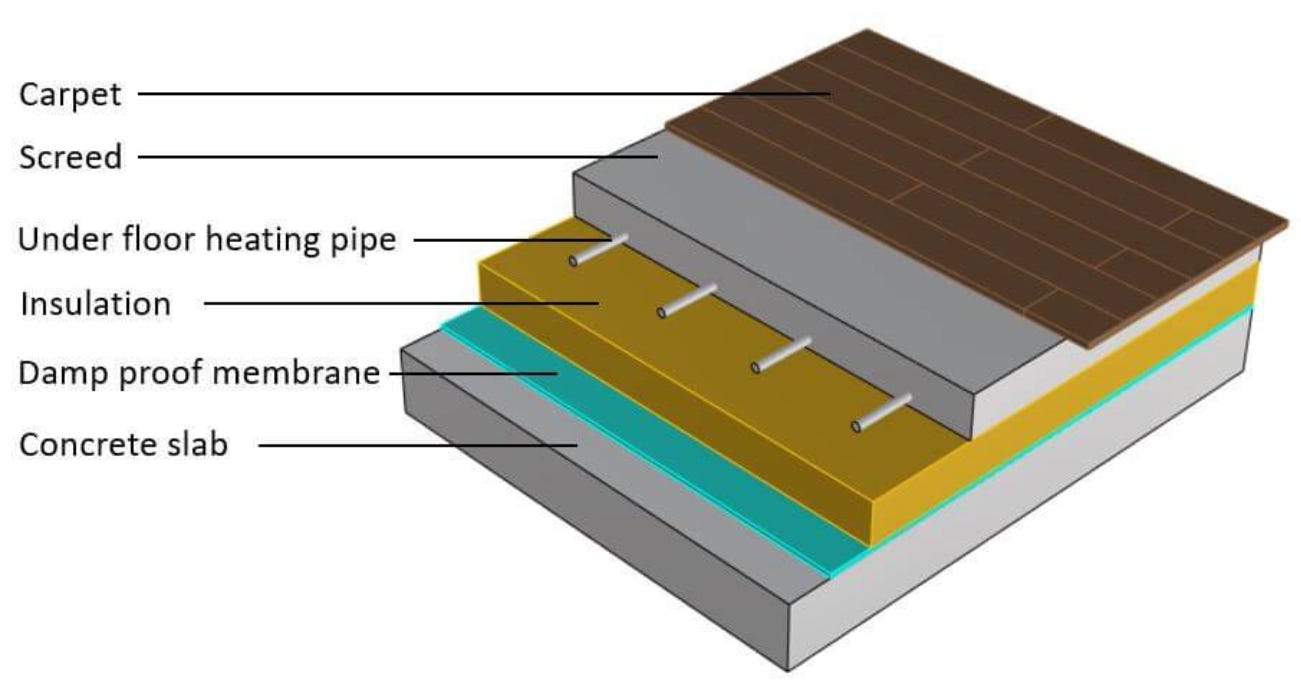
To calculate the dead load of each layer, I advise you to google either the density of the material or check if the product specifies its weight.
For example, by googling, I found that Rockwool insulation varies from 22 kg/m3 to 1000 kg/m3 in density. So pick a specific product and find its density. Or if you don’t know yet which product you use, it’s always a good idea to find 3 values from different manufacturers and use the highest density in your calculation.
You calculate the dead load for each layer individually and then add up the values to get the area dead load which you have to apply to the slab.
Dead Load Direction
Now that we know how to calculate the dead load and its different types, we have to take a look at how to apply it to structural members.
In most cases, the dead load is applied to a horizontal element like for example a slab, balcony, flat roof, or stairs.
And in that case, the dead load can simply be applied vertically, as in the next picture, where a floor slab is supported on 3 edges by walls.

Now, it gets a bit more tricky when we need to apply the dead load to an inclined structural member like a rafter roof. We wrote an extensive article about loads on roof structures, and you can check it out here.
But the short version: The dead load gets applied to inclined structures with the load direction is z-axis downwards ⬇️, while the distribution follows the inclination of the roof. See for yourself.

Conclusion
The dead load was the first load we covered in detail. Next week, we’ll check out the live load in detail.
If you missed episode #1 of this new series, then you can find it → here ←. In that post, we gave an introduction and overview of all structural loads, we consider in structural design.
Have a great rest of the week.
Until next Wednesday. 🙋♂️🙋♂️
Cheers,
Laurin. 😎😎
Enjoy the newsletter? Please forward to a friend you think could like our structural engineering content. It only takes 14 seconds. Making this one took a few hours. Just forward this link: https://www.structuralbasics.com/newsletter/